 | |
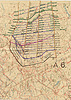
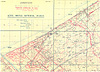
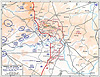
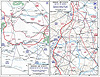
Map 1. Planning map for a creeping barrage, Messines Ridge area, June 1917. This map shows the creeping barrage planned for IX Corps (see MAP 4) at Messines Ridge. Maps like this would have been distributed to every field artillery brigade involved in the operation.
Detail (1162 x 1636) |
|
 | |
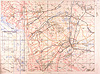
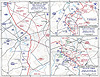
Map 2. Planning map for heavy howitzer barrage, Messines Ridge area, 7 June 1917. Ahead of a creeping barrage, medium and heavy howitzers laid down a lifting barrage. This map shows the planning of such a lifting barrage and how deep a barrage went by mid-1917. A map for the previous day is exactly the same. This barrage was fired on the day of the attack, but the previous day an identical barrage was fired to soften the Germans up even more than the preliminary bombardment, to inflict casualties, to test British preparations, and to confuse the Germans about when the attack was actually going to be launched.
Detail (1076 x 1360 |
|
 | |
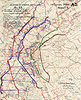
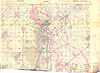
Map 3. Planning map for heavy artillery barrage, Messines Ridge area, 6 June 1917. Compared with Map 2, this shows another band of heavy artillery fire, even deeper into German lines. In addition to bands of fire that extended the creeping barrage up to seven hundred yards deep, heavy artillery fired one or two bands of fire further into the German lines. The shelling shown on this map was intended to be a final touch on any German defenses in Wytschaete village and to block reinforcements from moving forward.
Detail (1000 x 1279) |
|
 | |
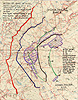
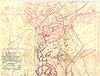
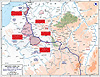
Map 4. Messines Ridge sector, June 1917. This shows the outlines of the battle of Messines Ridge, and some of the details of the German position. The sheer number of targets to be bombarded can be seen on the inset maps. |
|
 | |
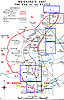
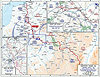
Map 5. Coastal sector Active Hostile Batteries map, 27 October 1917. In the coastal sector, the Germans had the upper hand in terms of artillery. For an offensive to succeed, the British needed to destroy or neutralize the majority of artillery batteries shown on this map, and to do so quickly. The broader situation never warranted the attempt, and the BEF consciously chose not to try nibbling what it could not swallow in one bite.
Detail (1609 x 1158) |
|
 | |
Map 6. Harassing fire map, Loos sector, August 1917. An immense amount of intelligence could be accumulated in a quiet sector. This map contains not only a great deal of counter-battery information but also details about the routine German trench garrisons and their standard travel routes. With this information in hand, the BEF could fire to inflict casualties, fire to block some or all routes of travel, or to lull the Germans into patterns that could be exploited later.
Detail (2259 x 1675) |
|
 | |
Map 7. Battery map, Somme sector, c. mid-1916 This is typical of the maps that every battery was issued for every position that they occupied. It shows the battery's arc of fire, and the targets within that arc. Along with a registration book, this allowed the battery to engage the targets quickly. While there must have been millions of battery maps produced during the war, this is the only example that I have found, because they were so ephemeral.
Detail (1352 x 988) |
|
 | |
Map 8. Bombardment map, Vimy Ridge, 4 April 1917. The dense network of German trenches in this sector was largely destroyed in the bombardment before the battle of Arras. By 9 April, the First Army found that there had been too much trench bombardment.
Detail (1099 x 834) |
|
 | |
Map 9. V Corps barrage map, Cambrai, 20 November 1917. At Cambrai the BEF fired a lifting barrage that moved straight from target to target instead of sweeping all the ground in between lines, as a creeping barrage (MAP 1) did. The smoke barrages shown here were weather-dependent, but the weather was favorable on 20 November and they were fired. However, while they were effective for their duration, that duration had been miscalculated, and German anti-tank fire became effective.
Detail (960 x 1203) |
|
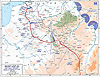 | |
Map 10. Western Front, Allied offensives, 1918. This map shows the outlines of the Allied, including British, offensives in 1918.
Detail (1242 x 961) |
|
 | |
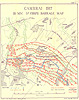
Map 11. Western Front, September-November 1914. This map shows the locations of the BEF's main battles of 1914.
Detail (1241 x 961) |
|
 | |
Map 12. Western Front 1915-1916. This map shows the sites of the main battles of 1915 on the Western Front.
Detail (1233 x 946) |
|
 | |
Map 13. Somme sector, 1916. This map shows the Somme sector and the Allies' painfully slow progress in 1916 that did, ultimately, make the Germans withdraw to the Hindenburg Line.
Detail (1242 x 961) |
|
 | |
Map 14. Western Front, 1917, including Battle of Arras. This map shows the main developments of early 1917 on the Western Front. The Germans withdrew to the Hindenburg Line, dislocating the French spring offensive, while the British attacked around Arras.
Detail (1242 x 961) |
|
 | |
Map 15. Western Front, 1917, Battles of Messines, Third Ypres, Cambrai. This map shows some detail of the BEF's three main battles of the latter half of 1917.
Detail (1242 x 961) |
|
 | |
Map 16. Western Front, 1918, German offensives through mid-July. This map shows the situation on the Western Front after the German offensives had petered out, and as the BEF was regrouping. Minor attacks and heavy artillery fire were the main British aggressive acts until the major counteroffensives began in mid-July.
Detail (1242 x 961) |
|
 | |
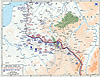
Map 17. Western Front, Michael and Georgette Offensives. This map shows the rapid initial progress of the Amiens attack, followed by the results of stiffening German resistance.
Detail (1242 x 961) |
|
 | |
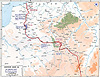
Map 18. Battle of Amiens. This map shows the rapid initial progress of the Amiens attack, followed by the results of stiffening German resistance.
Detail (1242 x 961) |