|
| |
|
Over the winter of 1916-17, the BEF digested the experience of the Somme. Two armies, nine corps, and forty-nine divisions had fought there for at least two weeks, and even more units had come and gone. This dwarfed the single biggest battle of 1915, which involved one army, three corps, and nine divisions. What is impressive, given the reputation of World War I generals for obstinacy, is the eager search for lessons. Very shortly after the Somme battles ended, both the Fourth and Fifth Armies compiled reports of 'lessons learned' with an eye to improving training and tactics across the whole BEF. 1 (One of these is available as Appendix 19.) This led to a new batch of tactical, planning, and training pamphlets. Unsurprisingly some of the many pamphlets published in 1916 only needed minor updating, while some were completely revised, and there were completely new topics to be covered. 2 However, whatever details were updated or new wrinkles were added, the purpose of the bombardment—the obliteration of German defenses—was unchanged., although now new areas were covered. | 1 |
|
The main planning guide, SS139/4, Artillery in Offensive Operations, was considerably improved and expanded, as the following passage indicates. | |
| 5 |
| |
|
Contrasted with the previous year's edition, there is better balance between artillery and infantry. Moving towards a genuine combined-arms doctrine, many sections were lifted straight from the infantry training pamphlet. 3 Gone was the ominous comment about attacks going ahead with manifestly insufficient support, although the infantry were certainly sacrificed in many attacks in 1917. Improved communication was also stressed, perhaps so the infantry would not feel neglected. The artillery was not neglecting the infantry, but the nature of fighting was changing, with far more of the artillery's work being done out of sight of the frontline infantry. Thanks to new German defensive tactics, counter-battery work and targets in depth were more important than ever. 4 This was a tribute to the Royal Artillery's half-success in 1916—with enough guns and shells to obliterate the German front line, they had forced tactical changes on the Western Front. But tactical changes did not bring the war, or even trench warfare, to an end. | |
|
The hopes expressed in early 1915—that more artillery would bring about a return to maneuver warfare—were false. British tactical changes also reflect the far greater skill, experience, and firepower of the infantry, which was increasingly comfortable with the artillery working elsewhere on the battlefield. Counter-battery fire became a higher priority than trench destruction, and would stay so for the remainder of the war. Greater firepower also made barbed wire less important, while preparing what would now be called the 'deep battle' was more so. Although breaking into the German defenses was now more likely, in the debate over bite-and-hold versus breakthroughs, the chances of a breakthrough were still small. This did not cause much change in Allied strategy, which still focused on driving the Germans out of France as quickly as possible. The strategic picture grew much more complex in April with the Russian Revolution, the American declaration of war, and mutinies in the French Army. British politicians (especially the Prime Minister, David Lloyd George) were increasingly reluctant to support unlimited offensives, but when push came to shove they authorized the offensives and saved the recriminations for their memoirs. | |
|
Perhaps the biggest change visible to the infantry was the declining importance of barbed wire. With new weapons and the new 106 fuse, wire-cutting became quicker, even though the Germans vastly thickened their entanglements. The fuze allowed howitzers to cut wire reliably. This had two effects: one howitzer shell could cut twice as much wire as an 18-pounder gun shell, and howitzers could also cut wire on a reverse slope (the far side of a hill), something guns could not do, and this meant German positions there were now vulnerable. Despite new German tactics that put less emphasis on holding the front line (and even the entire first system of trenches, with frontline, support, and reserve trenches), bombardments grew longer. Because there was no longer much doubt the front line would be taken, operations now revolved on whether the second or third system could be taken in the initial rush. Not only were the German second and third trench systems now British objectives that needed thorough bombardment, the increased German emphasis on mounting counterattacks meant the troops in those systems and other reserves had to be bombarded. But increasing the depth of the objectives increased the number of targets while reducing the number of guns that could reach them. To do more work with fewer resources took more time. Even though new artillery units continued to flow from Britain to France during 1917, there were still never enough: demand continued to rise faster than supply. In 1918 the proportion of heavy artillery would be high enough to allow rapid saturation shelling of deep targets (at least where German defenses were weak), but this was not possible in 1917. | |
|
Two examples will illustrate the changes. The Somme attack had been preceded by seven days' heavy bombardment, although only five days had been planned. For the Arras offensive, despite using much more heavy artillery, and starting preliminary elements of the bombardment weeks earlier, there were still five days of intense bombardment; the longer target lists simply took more time. Arras: The Planning | 10 |
|
The BEF's general goal at the beginning of 1917 was to improve on the previous year rather than to go down a new road. Bite-and-hold was not adopted as the main strategy, not least because it did not fit with Allied war aims. Some attacks with limited objectives were made, particularly to seize key terrain like Vimy Ridge, or Messines Ridge, and Hill 70 outside Lens. There was little chance of a German counter-attack once the BEF took these features, and these battles were set-pieces with, at most, very limited exploitation planned. Vimy Ridge and Messines Ridge were related to other battles nearby (Arras and Passchendaele, respectively), but the rest of the battle took place beside, not over, the ridges. In planning the first battle of the new year, there was a chance for new methods to be tried, but it was rejected for a variety of reasons, and evolution was chosen over revolution. | |
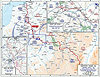 For 1917, the Allies first planned massive joint offensives—French, British, Italian, and Russian—to swamp the German reserves and force major withdrawals. (Map 14 shows the Western Front in the first half of 1917.) The British share of the Allied offensive was intended to be a resumption of the Somme offensive, but that idea was soon dropped and the task was handed to the Third Army, around Arras. In late January, at a conference of army commanders, the Third Army's commander (General Sir Edmund Allenby) produced a plan for a surprise attack. 5 He included 48 hours of intense bombardment, but the main emphasis was on surprise: "The object of this comparatively short bombardment is to obtain the advantage of surprise." 6 This plan was submitted before the Germans withdrew to the Hindenburg Line, which shortened their line and economized troops, many of whom went into reserve near Arras. Allenby judged that his attack would break through the thin German lines and that few reserves were available to fill holes. He was also implicitly showing more faith in the British infantry, judging that they could fight their way forward rather than just follow behind a barrage, a view that was very much in keeping with Artillery in Offensive Operations. GHQ did not criticize Allenby's assumptions; instead, it objected to the new methods. (These were not even terribly new: the Third Army had already submitted plans for an attack on Monchy-le-Preux with the same elements, and GHQ replied that Haig "approved generally of your plan." ) 7 Haig personally took his time pondering Allenby's methods (at the conference he had reserved his comments), and leaned heavily upon his artilleryman, Birch, for analysis. For 1917, the Allies first planned massive joint offensives—French, British, Italian, and Russian—to swamp the German reserves and force major withdrawals. (Map 14 shows the Western Front in the first half of 1917.) The British share of the Allied offensive was intended to be a resumption of the Somme offensive, but that idea was soon dropped and the task was handed to the Third Army, around Arras. In late January, at a conference of army commanders, the Third Army's commander (General Sir Edmund Allenby) produced a plan for a surprise attack. 5 He included 48 hours of intense bombardment, but the main emphasis was on surprise: "The object of this comparatively short bombardment is to obtain the advantage of surprise." 6 This plan was submitted before the Germans withdrew to the Hindenburg Line, which shortened their line and economized troops, many of whom went into reserve near Arras. Allenby judged that his attack would break through the thin German lines and that few reserves were available to fill holes. He was also implicitly showing more faith in the British infantry, judging that they could fight their way forward rather than just follow behind a barrage, a view that was very much in keeping with Artillery in Offensive Operations. GHQ did not criticize Allenby's assumptions; instead, it objected to the new methods. (These were not even terribly new: the Third Army had already submitted plans for an attack on Monchy-le-Preux with the same elements, and GHQ replied that Haig "approved generally of your plan." ) 7 Haig personally took his time pondering Allenby's methods (at the conference he had reserved his comments), and leaned heavily upon his artilleryman, Birch, for analysis. | |
|
In the first follow-up discussions with Allenby, Haig promptly called on Birch for support, and many of Birch's main concerns formed the basis for GHQ's queries. 8 As Birch wrote: | |
| 15 |
| |
|
Birch was showing less confidence in the infantry by suggesting a heavy bombardment and complete wire-cutting. When Haig did give his views, he only noted that Allenby's plan was "bold." 10 Unfortunately for Birch, Holland had done thorough research and rebutted each point. 11 GHQ was (as usual) worried about morale and wire-cutting, but it also thought the Third Army wanted too much destruction; finally, it deprecated the possibility of surprise. 12 GHQ had not fully examined its own arguments. It said that surprise was impossible, but wanted a longer bombardment (to facilitate wire-cutting), but a less intense one that would destroy less of the German trenches. The Third Army answered each of these points, but by this stage in the process time was running short and GHQ had either to accept Allenby's plan or flatly over-rule it. Out-argued—there was only one hesitant "?" in the margin—GHQ used its authority and warned Allenby by kicking Holland upstairs to command I Corps. 13 In the grand tradition of British army intrigues, seniority played a role, for Holland was Birch's senior in the Royal Regiment of Artillery, so Birch was simultaneously senior (in position) and junior (in rank) to Holland; this is why Birch's letter to Holland opened in such a mild tone. 14 It should be noted that GHQ was not alone in its doubts, nor was the argument simply one pitting Birch versus Allenby with Haig and Holland as seconds. Some of Allenby's subordinates responsible for the actual attack were unconvinced by Allenby's plan, as was the experienced artilleryman Herbert Uniacke, who was brought in to oversee the actual planning. 15 | |
|
This is not the place to attempt a counter-factual investigation of whether the Allenby/Holland plan would have worked. 16 Some aspects of it were deeply flawed, such as traffic control that would let the cavalry through the streets of Arras to exploit the expected breakthrough, a point that did fail in April. Other aspects were suspect, such as relying upon the Germans to make mistakes, although this did happen. But it must be remembered that these were not the grounds on which GHQ rejected the plan. Haig and Birch over-ruled Allenby because he was not doing things the tried-and-trusted way. It is surprising that GHQ should have taken this line, preferring trench-warfare methods that had been anathema in 1915 to the more traditional ones to which it always gave lip service. | 20 |
|
This in turn raises the question of Birch's influence over Haig, both in early 1917 and generally. Artillery in Offensive Operations had introduced a new scheme for artillery planning in attacks, dictating that each army's Major-General, Royal Artillery should decide the basis of bombardment plans (albeit consulting widely amongst the troops who would actually be involved) and then co-ordinate the detailed planning. However, GHQ specifically noted that armies were to work within "the limitations imposed by the Commander-in-Chief." 17 Birch himself leaned toward offering the infantry heavy support, as much as they wanted, later writing to the Official Historian that he liked to plan for complete wire-cutting. 18 If the infantry (after discussions) asked for more support than was ideal, he felt they had their reasons and the artillery should do as asked, while working to persuade the infantry for the next battle. In general, Birch had intermittent influence with Haig. The two got along quite well personally, for in the dark days of early 1918, when there was little either man could do to influence the fighting, Haig selected Birch to motor around the rear areas with him. 19 However, although Birch wrote of Haig that "it was marvellous the way he did attend to me, and he was most interested in the artillery," yet Haig was entirely willing to over-rule the artillery: "poor Haig—as he was always inclined to do—spread his guns." 20 It would always have been a struggle to persuade the man who drafted Field Service Regulations to re-think warfare, and Birch could not. His influence as a technical adviser was fairly constant: on questions of artillery material or tactics, Birch was consulted. But Haig saw artillery more in terms of tactics, and he was firm—to the point of obstinacy—about subordinating tactics to strategy. The relatively greater role Birch played at Arras may well have been because Haig was distracted by the Prime Minister's machinations at Boulogne, where Lloyd George was working to put the BEF under French control in hopes of avoiding another costly British offensive or paying the political price of removing Haig. Arras: The Battle | |
|
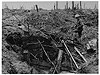
After fighting amongst themselves, the BEF opened the battle of Arras against the Germans. The bombardment began on 20 March (Z-20) and the infantry assaulted on 9 April 1917. 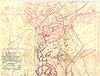 Whether or not it was due to so much high-level interest or the improved command arrangements, the artillery did its work well. The bombardment was the best to date (even too heavy on parts of Vimy Ridge), and the barrages worked smoothly. 21 Map 8 shows the bombardment in process. Allenby wrote his wife, "The artillery were brilliant, and the German guns were smothered from the start." 22 The infantry gained ground across the front. While there was no breakthrough, in some places the infantry advanced further than they would at the battle of Cambrai, noted for its near-breakthrough. As was ever the case in World War I, with movement and communications difficult to organize, the advance was not as smooth on succeeding days. Novel elements like smoke barrages and the 106 fuse 23 had worked extremely well, but extending the supply lines forward across the churned battle zone was a slow process. The Germans reinforced, especially adding more artillery. In roughly one week there was a new equilibrium. The Germans had yielded the ground the British artillery could reach from its original positions and had brought up significant reinforcements. The impetus provided to the British advance by the bombardment had worn off. Had the BEF been operating on its own, the battle might have been broken off, but it had to be prolonged with a series of expensive and relatively unsuccessful attacks because the French armies had mutinied, refusing to attack. To pin down the German reserves and prevent any attack on the French, the BEF renewed its attacks. Conditions degenerated into fighting like that in the later stages of the Somme. Breakthroughs were impossible, and the large quantities of artillery on both sides dominated the fighting. The guns would bludgeon the way for infantry to take or re-take this trench or that. Whether or not it was due to so much high-level interest or the improved command arrangements, the artillery did its work well. The bombardment was the best to date (even too heavy on parts of Vimy Ridge), and the barrages worked smoothly. 21 Map 8 shows the bombardment in process. Allenby wrote his wife, "The artillery were brilliant, and the German guns were smothered from the start." 22 The infantry gained ground across the front. While there was no breakthrough, in some places the infantry advanced further than they would at the battle of Cambrai, noted for its near-breakthrough. As was ever the case in World War I, with movement and communications difficult to organize, the advance was not as smooth on succeeding days. Novel elements like smoke barrages and the 106 fuse 23 had worked extremely well, but extending the supply lines forward across the churned battle zone was a slow process. The Germans reinforced, especially adding more artillery. In roughly one week there was a new equilibrium. The Germans had yielded the ground the British artillery could reach from its original positions and had brought up significant reinforcements. The impetus provided to the British advance by the bombardment had worn off. Had the BEF been operating on its own, the battle might have been broken off, but it had to be prolonged with a series of expensive and relatively unsuccessful attacks because the French armies had mutinied, refusing to attack. To pin down the German reserves and prevent any attack on the French, the BEF renewed its attacks. Conditions degenerated into fighting like that in the later stages of the Somme. Breakthroughs were impossible, and the large quantities of artillery on both sides dominated the fighting. The guns would bludgeon the way for infantry to take or re-take this trench or that.
Messines Ridge | |
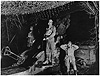
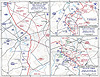 The next British attack was up the Messines Ridge. (Map 15 shows the British attacks in the second half of 1917, while Map 4 shows the Messines sector in excellent detail.) The infantry attacked on 7 June, about a month after the fighting at Arras died down, but the bombardment had begun a month earlier. The pause was necessary to perfect the artillery arrangements, mainly moving many of the guns north from Arras. There was enormous similarity in the planning at Messines Ridge and that at Vimy Ridge. Some of this was deliberate, with proven methods and plans being passed along informal networks as well as published via the SS pamphlets. The next British attack was up the Messines Ridge. (Map 15 shows the British attacks in the second half of 1917, while Map 4 shows the Messines sector in excellent detail.) The infantry attacked on 7 June, about a month after the fighting at Arras died down, but the bombardment had begun a month earlier. The pause was necessary to perfect the artillery arrangements, mainly moving many of the guns north from Arras. There was enormous similarity in the planning at Messines Ridge and that at Vimy Ridge. Some of this was deliberate, with proven methods and plans being passed along informal networks as well as published via the SS pamphlets. 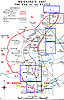 For instance, Lieutenant Colonel A. F. Brooke passed Canadian Corps' voluminous and detailed counter-battery plans to X Corps, which was covering a flank at Messines. 24 Messines Ridge dominated the southern flank of the Ypres Salient and had been an obvious British objective since September 1914. The Germans had recognized the obvious and fortified it heavily. The BEF had decided to launch a set-piece attack. Nineteen mines, containing roughly a million pounds of high explosives, had been excavated under the Ridge, taking over a year to prepare. Administrative and tactical plans had been started as well, although they could not be finalized until the forces available were known. 25 The two corps in the sector had been in place for a very long time, and their thorough local knowledge gave the British artillery great advantages. Also, since each ridge, while opening the way for a larger offensive, was a limited attack in itself, the British had the tactical advantages of biting-and-holding. (Photo Essay 2 has a variety of photos about Messines.) For instance, Lieutenant Colonel A. F. Brooke passed Canadian Corps' voluminous and detailed counter-battery plans to X Corps, which was covering a flank at Messines. 24 Messines Ridge dominated the southern flank of the Ypres Salient and had been an obvious British objective since September 1914. The Germans had recognized the obvious and fortified it heavily. The BEF had decided to launch a set-piece attack. Nineteen mines, containing roughly a million pounds of high explosives, had been excavated under the Ridge, taking over a year to prepare. Administrative and tactical plans had been started as well, although they could not be finalized until the forces available were known. 25 The two corps in the sector had been in place for a very long time, and their thorough local knowledge gave the British artillery great advantages. Also, since each ridge, while opening the way for a larger offensive, was a limited attack in itself, the British had the tactical advantages of biting-and-holding. (Photo Essay 2 has a variety of photos about Messines.) | |
|
Messines was also the first large attack for the Second Army, which in various smaller actions had built a reputation for meticulous planning and preparation. Three things helped at Messines: the long lead-time, the lack of major last-minute changes, and the limited objectives. 26 Still, it was the first effort by General Plumer and his MGRA, George Franks, and they had to rely on others' examples. The planning guidelines from the Somme and Arras were applied and combined with the experience accumulated in smaller actions in the Ypres Salient. Counter-battery artillery was allotted according to formula, and the bombardment, wire-cutting, and barrage were all done at standard rates. 27 There was a small argument about how far the initial rush should go, with the Second Army, rather than GHQ, being the ones to insist on deeper objectives, including the German artillery line. The Second Army insisted, "we must get those bally guns" behind the ridge, and plans were adjusted. 28 | |
|
In all this Plumer had complete confidence in Franks, even to the point of allowing Franks to go on leave, returning only days before the attack. 29 This may have been scheming on Plumer's part, for with Franks away he had an excuse to avoid changing the artillery plan according to the vicissitudes of GHQ. If Plumer was indeed anticipating interference, he was right, and it came at the last minute. 30 There was no complaint with the nature of the bombardment (there could have been few, since it came straight from GHQ publications), but suddenly GHQ wanted to detonate the mines early, simply to improve the counter-battery effort. The new idea was to detonate the mines so that the Germans would think the infantry assault had begun and open fire with their concealed artillery. The British would then shell the newly revealed German guns. That Birch should ever conceive such a plan, and get Haig's approval, shows how important counter-battery fire had become vis-�agrave;-vis bombardments—the German infantry were far from the most important part of the defense. As we know, this bizarre plan was not implemented; the mines were saved for Zero Hour. The Second Army appeased GHQ's counter-battery mania by increasing still further the percentage of guns dedicated to counter-battery work and altering barrages. Birch still fussed about the details, lecturing the Second Army's chief of staff on how to conduct the counter-battery operations, but if the methods may have annoyed the Second Army, the results were excellent. 31 | 25 |
|
The BEF easily took Messines Ridge. The bombardment (including counter-battery work) had been extremely effective, and the mines obliterated or stunned the German infantry on the ridge. The initial objectives were easily taken, and reserve troops passed through to take the secondary objectives. Because a river flowed east of the ridge, the Germans could not easily mount a major counterattack, and wisely did not try to: any efforts would have been hampered by the river crossings, uphill and into the teeth of a formidable British artillery concentration. The British defensive barrage decimated local counterattacks. The worst problems with the British artillery were bad communications between forward observers, who misidentified friendly infantry as Germans and shelled their own men. Third Ypres: Planning | |
|
Before the launch of the Third Battle of Ypres, as between Arras and Messines, there was a pause in British operations. Men and guns had to be moved, administrative and operational plans drafted. There was also the problem of taking over frontage from the French by the Fifth Army, and the coastal sector by XV Corps. All this had to be done from a standing start, since there were no plans ready on the shelf as there had been for Messines. 32 GHQ's plans were mostly strategic, emphasizing clearing the Belgian coast, rather than operational, which would have focused on taking the Gheluvelt Plateau, and nobody had carefully addressed the tactical problems. At a May conference at Fifth Army headquarters the bombardment's duration was not even on the agenda, and was only raised as a question from the floor. 33 | |
|
While Haig was keen to attack in Flanders, and had strategic reasons for doing so, he certainly should have issued warning orders to start the planning process. Perhaps he was constrained in doing so by the lack of Cabinet support for the attack—the Cabinet were keen on the strategic objectives, but shied away from the anticipated losses. Moreover, the BEF had only recently emerged from the French control that Lloyd George had engineered at Boulogne, and planning may have been constrained by the French. Regardless of the reasons, there was a gap of seven weeks between Messines and the first infantry attack of the battle that would culminate at Passchendaele. Not all of this was devoted to building roads and training troops; there was time to digest some of the lessons from Messines. Plumer's staff provided the grist for two SS pamphlets; several others would come out in July or August 1917 distilling recent events for the rest of the BEF. 34 | |
 The Germans did not waste the seven weeks either, using the time to build a large number of pillboxes around the Ypres Salient. These forced a further delay beyond the administrative delay, since the British infantry wanted most of the pillboxes destroyed before the attack. The BEF was in an unfavorable geographical situation, overlooked and encircled, attacking uphill and out of a salient. The Germans had decided to fight on favorable ground rather than withdraw to a fresh line further east and thus delay the British attack by giving up a few miles of ground. The Germans reinforced their artillery, which meant the Royal Artillery needed over a month to gain the necessary counter-battery advantage. That Flanders was the chosen arena for the year's major British offensive, despite its unsuitability for artillery, is another reminder that the BEF placed strategy first, infantry and cavalry concerns second, and technical considerations only third. Senior artillerymen knew it was a bad place for the artillery, and commented on it freely, but did not seek to change matters. The Germans did not waste the seven weeks either, using the time to build a large number of pillboxes around the Ypres Salient. These forced a further delay beyond the administrative delay, since the British infantry wanted most of the pillboxes destroyed before the attack. The BEF was in an unfavorable geographical situation, overlooked and encircled, attacking uphill and out of a salient. The Germans had decided to fight on favorable ground rather than withdraw to a fresh line further east and thus delay the British attack by giving up a few miles of ground. The Germans reinforced their artillery, which meant the Royal Artillery needed over a month to gain the necessary counter-battery advantage. That Flanders was the chosen arena for the year's major British offensive, despite its unsuitability for artillery, is another reminder that the BEF placed strategy first, infantry and cavalry concerns second, and technical considerations only third. Senior artillerymen knew it was a bad place for the artillery, and commented on it freely, but did not seek to change matters. | |
|
Eventually the British did win the counter-battery struggle, at a considerable cost in guns, gunners, and fatigue. The Germans adopted new counter-battery tactics optimized to the congested Ypres Salient. They did not try so much to destroy British units as to disrupt and disorganize. Harassing fire (often at night), interdiction of supplies, night bombing, gas, and firing at general areas rather than specific targets all served to fatigue and disorganize the British. The German objective was to delay the attack as much as possible, which worked fairly well. Judging by British memoirs and accounts, it was an effective policy, and very unpopular. Many heavy artillery batteries had already been through the Vimy/Arras and Messines battles, because there was not enough heavy artillery to allow much resting on the quieter portions of the front, and they were not fresh when they arrived in Flanders. | 30 |
|
At the same time, the German positions were being bombarded. Under the circumstances there was never any doubt that the bombardment was going to attempt to destroy the bulk of the German defenses: topography favored the Germans to such an extent that any surviving artificial defenses could have meant an impregnable defensive line. Furthermore, both of the MGRAs involved, Charles Buckle of the Second Army and Herbert Uniacke of the Fifth Army, supported thorough bombardments. 35 The bombardment was heavy, prolonged, and thorough to the extent that for weeks to come German barbed wire was no obstacle. 36 Trenches were hardly a factor in Flanders, since the water table was so high, and the bombardment smashed the parapets the Germans had built up. Once these were broken up, the German infantry were fighting from shell holes, and could be dealt with by heavy barrages rather than a separate bombardment. The bombardment had much more trouble with the pillboxes. Most were sturdy enough to withstand anything except a direct hit, and some could survive even that, although the troops inside could still be shaken or even killed by overpressure. Pillboxes were enough of a problem that the BEF obtained a supply of armor-piercing ammunition so they could literally crack them open, even at the cost of firing enough shells to obtain direct hits. 37 Third Ypres: The Battle | |
|
The Third Battle of Ypres famously did not go as planned, and later phases literally bogged down in mud that drowned men and horses. The first assault was on 31 July; it gained ground in unimportant sectors but was fiercely counter-attacked in key sectors, and the overall British gains were operationally unimportant. Throughout August the main effort was made by Hubert Gough's Fifth Army. Gough was well known as an aggressive "thrusting" general, and he tried to maintain a high tempo of operations. There were attacks every few days, not necessarily very large and generally poorly prepared. Gough was trying to wring the last benefits out of the massive preliminary bombardment rather than treating his subsequent attacks as separate operations. Most of the attacks failed, some gaining no ground, others unimportant ground, and others being rebuffed by German counterattacks. | |
 In early September, Haig handed most of the responsibility to Plumer's Second Army, which started methodical preparation for the next attack, including heavier bombardments. Plumer regained the counter-battery edge that had eroded in August when Gough switched the artillery to other targets, and Plumer also extensively bombarded the defenses. In early September, Haig handed most of the responsibility to Plumer's Second Army, which started methodical preparation for the next attack, including heavier bombardments. Plumer regained the counter-battery edge that had eroded in August when Gough switched the artillery to other targets, and Plumer also extensively bombarded the defenses. 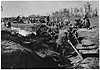 In large measure he did this by concentrating guns to a greater extent than previously; he simply had more material to work with, and he took his time to make sure things were done properly. 38 He took about a week between each bite to build supply routes, rotate in fresh infantry, familiarize the troops with the ground, and bombard adequately. His operations tempo was slower than Gough's, but he was more successful. He gained ground, held his gains, and was chewing up the German reserves. The Germans tried various tactical changes to stop or throw back the British infantry, but only increased their own losses. In large measure he did this by concentrating guns to a greater extent than previously; he simply had more material to work with, and he took his time to make sure things were done properly. 38 He took about a week between each bite to build supply routes, rotate in fresh infantry, familiarize the troops with the ground, and bombard adequately. His operations tempo was slower than Gough's, but he was more successful. He gained ground, held his gains, and was chewing up the German reserves. The Germans tried various tactical changes to stop or throw back the British infantry, but only increased their own losses. | |
|
This was close to the bite-and-hold methods some officers supported, and even some GHQ planners supported bite-and-hold under these conditions. (See Appendix 22 for an argument in favor of bite-and-hold.) Plumer was not quite so aggressive, attacking at weekly intervals rather than every two or three days as Gough had. 39 Plumer probably was not overly influenced by the memos within GHQ (nor was he harking back to du Cane's March 1915 ideas), but neither was he alone. Haig also gave Plumer more latitude than he had given Gough in August; there was a dim realization that momentum had to be built up via a bombardment. Throughout the campaign (to call it a battle hardly does it justice), bombardments were excellently organized and planned, and they worked extremely well (always, of course, provided that enough time and guns were allowed). (Appendix 24 has information on how bombardments were planned.) That the Royal Artillery was able to do so well in such an unfavorable sector as the Ypres Salient suggests that the same effort would have been even more successfully applied elsewhere. Plumer's successes brought pressure from Haig to increase the tempo of the advance, and Plumer yielded somewhat. However, another key to Plumer's success changed: the weather broke. Despite the muddy reputation of Flanders, September had been generally dry, and the Second Army had taken full advantage. The British attacks took longer to organize when guns, troops, and supplies had to negotiate muddy tracks. Smaller Operations | |
|
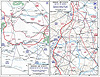
The influence of artillery outside the main, politicized battles can be seen in two small operations beside Passchendaele. 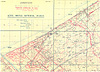 XV Corps had moved to the coastal sector to prepare a combined land-amphibious attack that was linked to the larger Flanders campaign. The Germans had the artillery edge in the sector, since they could use many of their super-heavy coastal guns. The corps calculated how many guns would be needed and the length of time required to win the counter-battery duel and to then bombard the German positions. 40 (Map 5 shows the coastal sector and the German batteries.) They also recognized there was no point in stretching fewer guns over a longer period: the Germans would respond to a gradual campaign and would have the upper hand unless the British struck a sudden, decisive blow. Haig noted the operation was "an artillery problem" and examined the papers, but in a rather cursory way. 41 In the end the coastal attack was never made, but it provides a rare example of the chess-like artillery struggle, predictable several moves in advance, overruling an operation. XV Corps had moved to the coastal sector to prepare a combined land-amphibious attack that was linked to the larger Flanders campaign. The Germans had the artillery edge in the sector, since they could use many of their super-heavy coastal guns. The corps calculated how many guns would be needed and the length of time required to win the counter-battery duel and to then bombard the German positions. 40 (Map 5 shows the coastal sector and the German batteries.) They also recognized there was no point in stretching fewer guns over a longer period: the Germans would respond to a gradual campaign and would have the upper hand unless the British struck a sudden, decisive blow. Haig noted the operation was "an artillery problem" and examined the papers, but in a rather cursory way. 41 In the end the coastal attack was never made, but it provides a rare example of the chess-like artillery struggle, predictable several moves in advance, overruling an operation. | 35 |
|
Another operation taking place during the Passchendaele campaign and largely driven by artillery was the Canadian Corps' battle outside Lens. Ordered to make a diversionary attack on Lens, Lieutenant-General Sir Arthur Currie (the corps commander) successfully argued to capture the dominating Hill 70 rather than plunge straight into the ruined city of Lens. 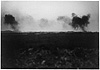 His reasoning was that powerful artillery support would allow the hill to be taken more cheaply and retained at less cost than fighting in the rubble. GHQ approved his planning, and the results proved the method. The Canadians took the hill at a light cost and used concentrated artillery fire to inflict heavy losses on German counter-attacks. The attack was successful at both gaining ground and pinning down German reserves away from Flanders. However, the pattern could not be used everywhere: shells and guns were needed for Ypres. His reasoning was that powerful artillery support would allow the hill to be taken more cheaply and retained at less cost than fighting in the rubble. GHQ approved his planning, and the results proved the method. The Canadians took the hill at a light cost and used concentrated artillery fire to inflict heavy losses on German counter-attacks. The attack was successful at both gaining ground and pinning down German reserves away from Flanders. However, the pattern could not be used everywhere: shells and guns were needed for Ypres.  Moreover, the heavy firing caused the Canadians' guns to wear out quickly, and during 1917 the supply of replacement guns was low, so Birch said the attack had to stop lest the Canadian Corps ruin its own artillery. 42 Haig expressed a preference to continue the attack, but allowed Birch to overrule him, demonstrating where authority was—and was not—delegated. The battle also shows GHQ still having divergent attitudes towards limited attacks (whether preliminary or diversionary) and major offensives. Technical considerations could be allowed to shape limited or secondary attacks, but major offensives would likely be driven beyond technical limits. Somehow, determination, willpower, and leadership (the traditional army qualities) would overcome the difficulties. Moreover, the heavy firing caused the Canadians' guns to wear out quickly, and during 1917 the supply of replacement guns was low, so Birch said the attack had to stop lest the Canadian Corps ruin its own artillery. 42 Haig expressed a preference to continue the attack, but allowed Birch to overrule him, demonstrating where authority was—and was not—delegated. The battle also shows GHQ still having divergent attitudes towards limited attacks (whether preliminary or diversionary) and major offensives. Technical considerations could be allowed to shape limited or secondary attacks, but major offensives would likely be driven beyond technical limits. Somehow, determination, willpower, and leadership (the traditional army qualities) would overcome the difficulties.
Cambrai | |
|
By the later stages of Passchendaele, the BEF was already planning another attack, one of a very different nature. The battle of Cambrai depended on two elements—tanks and a surprise artillery barrage—and dispensed with any preliminary bombardment. The genesis of the plan came from a relatively junior artillery officer. Brigadier-General Hugh Tudor was filling in when his superior was on leave, and took the opportunity to gain the ear of the Third Army commander, General Sir Julian Byng. Byng then took up the ideas himself. 43 It only reinforces the artillery's subordinate role that R. St C. Lecky (the Third Army's MGRA) opposed the plan, but threw himself into it when over-ruled. 44 Tanks and guns combined to make the attack possible; its reputation as the first tank battle takes too much advantage of hindsight. | |
|
The story of Cambrai has attracted significant attention, and only a few points will be emphasized, mostly contrasting it with Allenby's plans for a surprise attack earlier in 1917. 45 (Appendix 26 shows some of the artillery planning.) Tanks provided a useful tactical boost, bringing firepower to bear on German positions in close support of the infantry. But more importantly, they restored operational surprise in a way very similar to the 106 fuze: the tanks reduced the time needed to breach the barbed wire barriers. At Cambrai, there were enough tanks to breach the wire over a substantial front (10,000 yards), avoiding the need for any preliminary bombardment. Another simultaneous technical advance in the artillery meant the guns did not have to register their targets, and thus there were no signs that the British were preparing an attack. | |
|
The whole attack was a surprise to the Germans, not just the timing of Zero Hour. Since they had no warning, the only German reserves in the area were there simply through luck (in contrast with Arras where the reserves were deliberately located there), and (unlike at Passchendaele) there was no reinforcement of the artillery. Allenby had wanted to minimize wire-cutting, but GHQ was reluctant to trust what looked like half-measures. Now that there was an ironclad guarantee of wire-cutting, Byng's plan was approved. The artillery also benefited from a technical revolution coming to fruition. Having struggled with an enormous learning process of teaching the new soldiers gunnery, and of everybody learning more advanced gunnery, by late 1917 all the pieces were in place. Guns could be calibrated behind the line, meaning they could move straight into position, and did not have to register, so they could fire accurately without revealing their presence. 46 The differences were most appreciable to those furthest forward, who dealt with the details of gunnery on a daily basis. By mid-1917 some corps were exploiting the new technology, and by the end of the year it had percolated up to GHQ. It is not clear how many gunnery details were explained to Byng, Haig, and their General Staff officers, but it does not particularly matter: they grasped the essential point that a new artillery method that offered significant operational advantages was available, and they supported its use. | |
|
In some regards this is remarkable. Earlier in 1917 GHQ had rejected a plan with strong traditional elements, but now was happy to adopt—and even expand upon—a plan that explicitly admitted that there would not be complete "preparation" of the German defenses. The time had arrived (as it had not earlier in the year) when the technical changes that had percolated throughout the BEF added up to a revolution, and Birch did not intervene as he had earlier. GHQ now trusted senior subordinates who had ideas of their own, a significant loosening of its centralized command style. It is not simply that officers at GHQ were too busy overseeing the last days of Passchendaele; they were fully engaged in the planning of Cambrai, and Haig himself spent several days inspecting the divisions involved. 47 Cambrai foreshadowed the battles of 1918 in many more ways than the presence of tanks and the absence of a bombardment. The Fifth Army's MGRA, Herbert Uniacke, came to nearly the same conclusion without having much experience with tanks: "If therefore we are ever going to pluck the fruits of victory, we must shell less lavishly or rather less destructively. 48" | 40 |
|
On 20 November the British attack began. It made good, if patchy, progress and the BEF learned new wrinkles about the coordination of advancing infantry, tanks, and artillery. But the Germans held onto a few key positions, and the value of surprise quickly dwindled. The British resorted to heavy, if quickly arranged, bombardments to gain ground, and the battle turned into a relatively ordinary slugging match for particular locations. On 30 November the Germans used their new storm-troop tactics of infiltration to launch a major counter-attack, which regained much of the ground they had lost. When the BEF examined the results of Cambrai for lessons about the future, the most obvious lessons were about liaison, mobile warfare, and defense—after all, there had been no preliminary bombardment. Reviewing 1917 | |
|
Through 1917 the BEF had fought several battles under a variety of conditions. Arras was supposed to be a preliminary attack, drawing German reserves away from a major French offensive. Vimy Ridge and Messines Ridge were both geographically limited attacks, taking the ridges but not exploiting any further. Third Ypres was a major offensive that had multiple stages and had the longest preliminary bombardment of the war. Cambrai had no preliminary bombardment at all. The strategic and operational goals may have changed, but the bottom line for the artillery did not change: the artillery was working to help the infantry. | |
|
Senior artillerymen were still not trying to change the supporting role of artillery. Herbert Uniacke, having commanded the Fifth Army's artillery through the year's battles and handled the planning of the battle of Arras, drew up his lessons for the year. 49 His tactical notes alone stretched to twenty pages and give a great range of detailed comments on how the artillery could produce the most effective fire. But he never lost sight of the reason for producing that fire, his concluding sentence being | |
| |
|
Uniacke clearly sought the best way to orchestrate his guns, and knew that success was more than just seizing ground, it was in seizing it at the least cost. However, his ultimate purpose was unchanged: support the infantry as best he could. 1918: Early Attacks | 45 |
|
There were no British attacks in 1918 until the Germans wore themselves out; defensive tactics were the order of the day. But as soon as the Germans stopped, the BEF began attacking again. Initially the BEF launched only minor operations, improving a local situation with perhaps a battalion of men, but using plenty of artillery support to reduce casualties. 51 Sometimes tanks were employed, most notably at Hamel. 52 Hamel was in some ways unusual, but was in other ways typical of the small attacks. It used relatively small infantry forces (two brigades), had limited objectives, faced weak German defenses, used lavish artillery (more than at Hill 70 the previous year, which was a tougher objective) and air support, and was very successful. 53 These were all typical features of the new brand of small attacks. The use of tanks (both in combat and supply-moving roles), and the involvement of American troops (which had been attached for training to the Australians) were not normal. Because of the tanks, the weak German defenses, and the overwhelming British artillery, the Allied forces quickly gained the objectives, took many prisoners, and suffered very few losses; the Germans did not even bother to try a counterattack, knowing their local reserves were not strong enough to face the compact, relatively fresh Australians. The lavish artillery support allowed the Australians to use less infantry in the attack, which led to lower Allied casualties. The artillery was also ample to both suppress the German artillery and (thanks to the weak German defenses) the German machine-gunners, which also kept Allied losses down. | |
|
were a rarity for these small attacks, but so were deliberate bombardments. Mostly this was because the German defenses were extremely weak; without strong defenses, there was little need for a bombardment. German defenses were weak because they had left the elaborate defensive positions they had built up over time and were instead holding wherever the offensives had chanced to run out of momentum. By moving into the open the Germans had, in a sense, opened themselves up to more effective Allied attacks. | |
|
As the German offensives grew smaller and less frequent, the BEF stepped up its minor attacks. The changing circumstances were obvious even at GHQ: bombardments were superfluous against light defenses that, thanks to the element of surprise, would be lightly held. The army commanders put a different spin on this at a June conference, noting that "Infantry ... must be trained to fight and manoeuvre under cover of artillery fire ... rather than to rely on the invariable support of a dense barrage." 54 Attacks therefore went ahead under the cover of a barrage and counter-battery fire, more like a raid in ordinary trench warfare. Different local situations prompted different methods, part of the new, decentralized BEF. At Meteren, the 9th Division fired an identical bombardment against the German positions every day for two weeks, finally attacking on the fifteenth day. The German defenses had been obliterated, and the Germans had become so accustomed to being shelled without an infantry assault that when the attack came it had tactical surprise, and casualties were low. As a further indication of how flexible decision-making had become, the commander at Meteren was Hugh Tudor, who was partly responsible for the surprise attack at Cambrai. Wedded to neither bombardments nor surprise, Tudor tailored his plans to fit local circumstances. This flexibility also reiterates the evolutionary British tactics. Had there been a conscious revolution it would have swept away these "old fashioned" methods. As it was, there was no revolution, and officers simply did what was necessary. At the same time, the artillery had become so sophisticated, so thoroughly trained, that individual guns were given tables that minutely recorded their tasks. 55 1918: Amiens | |
 The same flexibility was true in larger operations. Most of the details for the battle of Amiens were settled between the ANZAC Corps and the Fourth Army without involving GHQ. 56 (Map 18 shows the Battle of Amiens.) The basic plan was to launch a major surprise attack, using good infantry (the Canadian and Australian Corps were assigned), every available tank, and plenty of artillery, but above all surprise. The German line outside Amiens was weak; the Germans were still hoping to launch one more attack and capture that city's major rail junction, so they had little incentive to fortify heavily. In addition, the units in the line were both of poor quality and below strength. Tanks were important to the attack for two reasons. Not only did they provide mobile firepower in the attack but they also meant the artillery did not have to spend any time cutting the German barbed wire; the French First Army (attacking next to the British Fourth Army) did not have tanks, and thus needed a preliminary bombardment, although the commander was willing to risk quite a short one. The same flexibility was true in larger operations. Most of the details for the battle of Amiens were settled between the ANZAC Corps and the Fourth Army without involving GHQ. 56 (Map 18 shows the Battle of Amiens.) The basic plan was to launch a major surprise attack, using good infantry (the Canadian and Australian Corps were assigned), every available tank, and plenty of artillery, but above all surprise. The German line outside Amiens was weak; the Germans were still hoping to launch one more attack and capture that city's major rail junction, so they had little incentive to fortify heavily. In addition, the units in the line were both of poor quality and below strength. Tanks were important to the attack for two reasons. Not only did they provide mobile firepower in the attack but they also meant the artillery did not have to spend any time cutting the German barbed wire; the French First Army (attacking next to the British Fourth Army) did not have tanks, and thus needed a preliminary bombardment, although the commander was willing to risk quite a short one. | |
|
So crucial was surprise to this attack that Rawlinson ordered, "Previous to Zero night no circumstance less than an actual [German] attack in force ... would justify ... disclosing [the] concentration of guns." 57 Unusually for World War I, there was even a deception plan: the Canadian Corps was secretly moved from the Arras area to Amiens but left elements behind to pretend to be the whole Corps. Every soldier in the Fourth Army received a leaflet beginning with the words "KEEP YOUR MOUTH SHUT." The 1,450 guns available did not have to fire a bombardment, but still had plenty of responsibilities: counter-battery fire, interdiction of German rear areas, and a barrage. The opening day of the attack went off almost like clockwork. In most areas the objectives were gained, casualties were light, and prisoners were many. But mobile warfare was always difficult to organize, and over the next few days the Germans reinforced with men and guns while retreating to better defenses. Meanwhile, the Allied troops tired and straggled, supplies were slow coming up, tanks broke down, and the artillery was out of position. Momentum faded and the advance was halted after an argument between Haig and Rawlinson. Haig wanted Fourth Army to press ahead, albeit at a slower pace, but Rawlinson argued that fully supported surprise attacks were more effective. (A contemporary report is available as Appendix 35.) They reached a compromise: the Fourth Army planned step-by-step attacks, with the necessary bombardments, but instead GHQ launched an attack by the Third Army, using surprise and setting bigger goals. In a display of strategic and operational flexibility, the Third Army's ongoing diversions (which had helped the Fourth Army achieve its surprise attack) were converted into the real attack, while the pause before their surprise attack was ironically covered by the Fourth Army's obvious preparations for deliberate attacks. In this case it was not the Third Army petitioning to attack, but GHQ deciding that a surprise attack on weak German defenses was a better choice than renewing even a strong, carefully prepared attack against strong defenses. | 50 |
|
It is important to review why the BEF could now launch surprise attacks. Tanks played some role; where there was a high tank-to-infantry ratio, the tanks could create enough gaps in the barbed wire for the infantry to advance, freeing the guns to fire at other targets. However, the barbed wire was seldom a major obstacle at this point because the Germans had not had time to erect dense entanglements. "Silent registration," whereby the guns could be calibrated without having to fire ranging shots, was obviously important. It meant that guns could move into position and hit their targets without having to fire those ranging shots that would have revealed their presence. The sheer amount of artillery available was also important. The last artillery units formed in 1916 and 1917 had deployed to France and were in action. The German attacks in the spring of 1918 also raised the BEF's artillery-to-infantry ratio because, while a number of infantry brigades had been reduced to cadre strength and withdrawn from action, the artillery had taken much lighter losses and thus roughly the same number of guns were supporting fewer infantry. With enough artillery available, the BEF could pursue intense, smothering bombardments that deluged the German positions with great quantities of shells, achieving both destruction and neutralization at the same time. | |
|
But the key change took place on the German side. The weak German defenses played a critical part. It took many fewer guns to achieve an adequate fire intensity against weak defenses, and the smaller number of guns (and their associated ammunition dumps) could be more readily concealed in woods and valleys.  Making surprise a still more effective weapon, over the winter of 1917-18 the Germans had reorganized their infantry divisions. While some were upgraded to "assault" divisions, more were downgraded to "trench" divisions, with worse equipment and fewer of men, most of them either older or previously wounded. Thus the British surprise attacks hit not only weaker defenses but also weaker defenders. By the time the Germans had retreated back to their strong defenses (essentially the line where they had started their offensives), the accumulated defeats and losses had seriously undermined the morale of the survivors. Ludendorff and the Kaiser both had lost their nerve, and lost confidence in victory. Making surprise a still more effective weapon, over the winter of 1917-18 the Germans had reorganized their infantry divisions. While some were upgraded to "assault" divisions, more were downgraded to "trench" divisions, with worse equipment and fewer of men, most of them either older or previously wounded. Thus the British surprise attacks hit not only weaker defenses but also weaker defenders. By the time the Germans had retreated back to their strong defenses (essentially the line where they had started their offensives), the accumulated defeats and losses had seriously undermined the morale of the survivors. Ludendorff and the Kaiser both had lost their nerve, and lost confidence in victory.
1918: The Hundred Days | |
|
From Amiens to the Armistice, the Allied armies were constantly attacking the Germans and driving them back, switching the main effort when German resistance grew too strong in one area. 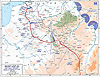 (Map 10 shows the Allied offensives in summer-autumn 1918.) By 1918, this was the sort of decision GHQ was making, rather than the detailed operational and even tactical interventions of 1916 and 1917. It had finally become an Army Group headquarters rather than a body of officers looking over the shoulders of army and corps commanders. In short order all of the British armies were unleashed in surprise attacks, and all made substantial gains. GHQ became enamored of the surprise attack, at one point even encouraging the Fourth Army to try and "bounce" the strongest sector of the Hindenburg Line without either a preliminary bombardment or tank support. Rawlinson complained: (Map 10 shows the Allied offensives in summer-autumn 1918.) By 1918, this was the sort of decision GHQ was making, rather than the detailed operational and even tactical interventions of 1916 and 1917. It had finally become an Army Group headquarters rather than a body of officers looking over the shoulders of army and corps commanders. In short order all of the British armies were unleashed in surprise attacks, and all made substantial gains. GHQ became enamored of the surprise attack, at one point even encouraging the Fourth Army to try and "bounce" the strongest sector of the Hindenburg Line without either a preliminary bombardment or tank support. Rawlinson complained: | |
| |
|
His objections were accepted, showing a more balanced relationship between army commanders and GHQ. 59 The artillery officers were still in the wings, advising. Rawlinson's senior artilleryman, Charles Budworth, had already noted that, "Although no preliminary bombardment preceded the [Hamel] attack on July 4th, it would be dangerous to assume that this is applicable generally to all future operations." 60 This was probably not why Rawlinson balked at attacking the Hindenburg Line without a preparatory bombardment, but it certainly was a background factor, an opinion he could quote to support his views. | 55 |
|
To breach the Hindenburg Line, the Fourth Army fired a four-day bombardment. There were neither enough guns (because the BEF had other operations underway) nor enough shells (because of logistical problems with the rapid pace of the Allied advance) to destroy all the German defenses. The artillery was concentrated on counter-battery fire, interdiction of German rear areas, destruction of key points (headquarters, observation posts, and the like), and only cutting gaps in the barbed wire rather than on complete removal. Despite a bombardment that observers later assessed as inadequate to even neutralize good German infantry, the British infantry broke through the Hindenburg Line.  The German troops holding the line were not willing to fight hard enough to hold it; German morale, a chimera between 1915 and 1917, had finally broken. 61 Charles Budworth reflected afterwards on the success that the bombardment had against the Hindenburg Line, noting both that it was deadly for the Germans and life-preserving for the British infantry, continuing to show his appreciation that, however important and effective it might be, the artillery's purpose was to support the infantry. 62 (A contemporary report of the artillery operations is available as Appendix 36.) The German troops holding the line were not willing to fight hard enough to hold it; German morale, a chimera between 1915 and 1917, had finally broken. 61 Charles Budworth reflected afterwards on the success that the bombardment had against the Hindenburg Line, noting both that it was deadly for the Germans and life-preserving for the British infantry, continuing to show his appreciation that, however important and effective it might be, the artillery's purpose was to support the infantry. 62 (A contemporary report of the artillery operations is available as Appendix 36.) | |
|
Haig also talked the Belgians out of a preliminary bombardment when they were planning to attack out of the Ypres Salient, a sure sign that conditions there had changed. 63 Once the Hindenburg Line was penetrated, the Germans retired gradually, not standing to fight unless the British infantry had outpaced the artillery. There would be a pause in a given sector until the British artillery arrived in force, and frequently the constraint on the artillery was the logistic system that was relying on motor transport over bad roads and hastily repaired bridges. Once the guns and shells arrived at the front, there could be quite stiff fighting and heavy bombardments—probably the heaviest was at Valenciennes, just days before the Armistice. 64 In their last major attack of the war, the Canadian Corps fired one 6-inch howitzer shell per 100 yards every 38 seconds, at times every 14 seconds; the lethal radius of such a shell was 500 yards, thus generating a theoretically completely lethal bombardment. Other heavy and field guns fired as well, theoretically killing the theoretically dead Germans again and again. Of course, not all the German soldiers were killed, but the bombardment was very successful in saving Canadian lives, albeit within limits. The deluge of shellfire allowed the Canadians to use less infantry, but casualties were still about one-third of the attacking infantry. Conclusion | |
|
The means available, and methods used, to prepare for artillery attacks changed through the war. At first, no preparatory bombardment was envisaged, and then came purely theoretical ideas about using artillery to blast a way through the German defenses and restore "proper" warfare. These too had to be discarded due to a lack of guns and shells, but also because of doctrinal conflict. When, at Neuve Chapelle, attacks began in trench-warfare conditions, there was a germ of these ideas uneasily combined with pre-war ideas about morale and leadership. The result was bombardments that tried to remove obstacles to the infantry advance. After its partial success in the first attack, the BEF got confused. It tried to increase the amount of fire, but did not look as closely at what that fire was supposed to do. Thorough destruction in a short period was never possible until the late months of the war, when the Allies had large quantities of artillery and the Germans were in weak positions. Before then, Allied artillery was weaker and German defenses stronger; the best that could be hoped for was neutralization if the bombardment was short, or else a truly destructive bombardment had to be quite long. Bombardments should have been matched with the kind of battle that was planned: a short bombardment should have been intense, which would have opened the way for a surprise attack. But barbed wire got in the way. It took days, even weeks to cut enough wire to satisfy the infantry, and the main bombardment had to operate in parallel with the wire-cutting. But either was enough to tip off the Germans and spoil chances of surprise. Since the infantry wanted, and probably needed, virtually total wire-cutting, there was no alternative, except to attack where the German defenses were lighter. That did not happen because strategy rather than tactics drove the Allies; offensive sectors were chosen for strategic reasons, not because of weak barbed wire. | |
|
Throughout 1916 and 1917 bombardments rose to such a pitch that they did destroy the German defensive organization, as well as front-line troops. But it took time, which the Germans used tactically to bring up reserves and thus forestall major British gains. The Germans also reorganized their defenses to at least try to avoid the heaviest parts of the bombardment. Defense in depth could be overcome by yet more artillery or more time, but either Allied adjustment gave the Germans at least some of what they sought. Both Allied options took some of the pressure off the Germans in terms of the number or tempo of Allied attacks. Eventually a combination of technical breakthroughs—one the tank, the other predicted artillery fire—allowed for surprise attacks, and the BEF (and Haig) wrung everything possible from its new operational opportunities. But it was not a revolution, and there was turning back. In 1918, when circumstances demanded a bombardment, it was done and often at an intensity previously unseen. Haig summed up the continuity of purpose in a letter to a former ADC: "...the arty [sic] methods employed [at Neuve Chapelle] were in front of anything which the French were then doing, and they also formed the basis on which our own artillery plans were based right up to the end of the war." 65 The BEF's goal was to get its infantry into battle at an advantage, and artillery bombardments were intended to do that, not to be the major attacking element in themselves. While certainly using mammoth quantities of artillery support, the BEF rejected the "artillery conquers, infantry occupies" style of the French. | |
|
The planning for an offensive gives a clear view of how an army intends to fight, and thus how it sees its strengths and weaknesses. Attacking forces generally have the initiative and can exploit their strengths and minimize their weaknesses. The British army gave lip service to inter-arm co-operation, but in reality everything else revolved around the infantry. (The quantity of support required also is silent evidence of how weak the British infantry was judged to be.) The artillery did not balk at playing a supporting role. They only argued that the infantry should pay attention to the other arms so that these could then provide the best possible support. An artillery staff officer later expressed this in the preface to an article: "Let it be granted ... the great ideal of 'gunners' is to support their infantry properly...." 66 But co-operation was not what the planning system tended to produce, at least until the infantry and General Staff had learned a great deal about trench warfare. For a long time this left the artillery officers explaining what the guns could and could not do, then others deciding what the artillery should do. Artillerymen thought co-operation should actually go both ways, and eventually, about the time of Cambrai, everybody understood what co-operation meant. In 1918 the BEF fought with varying methods as conditions varied; the artillery were heeded about methods and operations plans. Throughout the war, with or without enough material, whether or not planners listened, the artillery did what it could to open the way for the combat arms. | 60 |
|
Notes: Note 1: Fourth Army, "Artillery Lessons Drawn from the Battle of the Somme," Montgomery-Massingberd Papers, file 7/4; Fifth Army's in WO158/344. Back. Note 2: E.g. SS114, "Care of Guns During Prolonged Bombardment," (March 1917); SS131, on Royal Flying Corps- Royal Artillery co-operation (December 1916); SS552 on Sound Ranging (March 1917). Back. Note 3: SS135, "Instructions for the Training of Divisions for Offensive Action," December 1916, which should be compared with the edition used for the 1916 campaign, SS109, "Training of Divisions for Offensive Operations." Back. Note 4: see G. C. Wynne If Germany Attacks: the Battle of Depth in the West (London, Faber & Faber, 1940) and Lupfer, op. cit. Back. Note 5: It was Allenby's own plan, supported only by his artillery adviser Major-General Arthur Holland: Field-Marshal Viscount Allenby of Megiddo and of Felixstowe Papers, 6/VII/7, LHC (hereafter Allenby Papers). At the conference Horne, Rawlinson, and Gough expressed doubts about a short, heavy bombardment. (WO158/223, OAD291/12, 2 January 1917) However, Horne soon submitted his own offensive plan, which embraced a short bombardment (WO158/40). Rawlinson had less to say, perhaps recalling his experiences the previous year. Plumer, who was not present, presented a plan for a short-bombardment attack up Aubers Ridge three days later (WO158/38). Back. Note 6: GS1/15 of 7 February 1917 (WO158/223), and Third Army war diary (WO95/363) of the same date. Back. Note 7: SGR61/7, 28 December 1916; OAD260, 2 January 1917; WO158/223. Back. Note 8: Haig Diary, 28 January 1917. Haig's moderate comments were: "He has certainly gone very carefully into all details, but I wish some of his calculations to be checked by GHQ." Anstey's proofs for his History of the Royal Artillery (140) say Birch "intervened and objected" on his own accord: E. C. Anstey Papers, RAI Military Document 1159 (henceforth Anstey proofs and Anstey Papers). Birch to Edmonds, 22 November 1937, and C. E. Vickery to Edmonds 14 February 1938, CAB45/116. Oddly, in discussing the weight of the bombardment, as opposed to the method, GHQ used figures long out of date, from June 1916 and even from Loos; Birch to Holland, 4 February 1917, Anstey Papers. Back. Note 9: Birch to Holland, 4 February 1917, Anstey Papers. Back. Note 10: OAD314, 12 February 1917, WO158/223. Back. Note 11: GS1/25 of 21 February 1917 and OAD314. One of GHQ's complaints had been about wear of gun barrels. The Third Army had already done tests, the results of which were unveiled and issued as an update of SS114, "Notes on the Care of Guns During Prolonged Bombardment" (editions of March 1917 and June 1916, which does not survive). See letter, R. H. Andrew to Archibald Wavell, 13 August 1937, in Allenby Papers, LHCMA, 6/7.With unconscious irony, Haig wrote to the War Office after the battle, praising the performance of artillery equipment: wear had not been excessive. WO95/58-60, GHQ Director of Ordnance Services diary, 2 May 1917. The Third Army had tested its plans to the extent of having VI Corps fire a 48-hour test bombardment in early January and then have the infantry patrol the German line to see its effects, which were apparently satisfactory: VI Corps CHA diary (WO95/784). Back. Note 12: Birch to Holland, 4 February 1917, Anstey Papers. Back. Note 13: WO158/223. This may have been a calculated double snub: I Corps held a very quiet stretch of front, where Holland would have little activity. Holland was livid at GHQ's obstinacy, at one point storming around the office and offering to stand on a chair with his head in a noose in the Grand Place of Arras, the chair to be removed when the first German shell hit the city. Allenby Papers, 6/VII/7. In 1916 Haig had thought highly of Holland; removing him was only a warning to Allenby. Kiggell to Robertson, 4 June 1916, General Sir Launcelot Kiggell Papers, 4/20 LHC. Back. Note 14: Birch to Edmonds, 22 November 1937, CAB45/116 shows Birch's inhibitions about ordering Holland. According to King's Regulations (¶ 224(iii) and 225) Birch was right: he was technically junior to Holland. Back. Note 15: J. R. C. Charles(?) said that the GOC of XVII Corps doubted Allenby's plan: letter to Edmonds c. 14 July 1937, CAB45/116. See also letters from Cyril Falls to Archibald Wavell, 13 October 1938 and Charles Grant to Wavell, c. December 1938, both in Allenby Papers, LHCMA, 6/7. Back. Note 16: I consider that Allenby's plan stood a reasonable chance, at least before the German withdrawal to the Hindenburg Line provided more German reserves. For the contrary view see Jackson Hughes, The Monstrous Anger of the Guns: The Development of British Artillery Tactics, 1914-1918 (PhD dissertation, University of Adelaide, 1992). Back. Note 18: Birch to Edmonds, 22 November 1937, CAB45/116 and CAB45/132. Back. Note 19: E.g. OH 1918, vol. 2, 365, as they toured various corps headquarters on 18 April. Birch and Haig stayed in touch after the war, Birch visiting Haig at least once. Letter from the present Earl (who listened to the conversations) to the author, 31 July 1998. Back. Note 20: Birch to Edmonds, 29 June 1938, and 8 July 1930, both CAB45/132. Back. Note 21: Horne (commander of the First Army) complained to Haig of too much shelling tearing up the ground; Haig Diary, 12 April 1917. The First Army had more closely followed Birch's ideas on destruction than had the Third Army, so Birch's ideas were indeed more lavish than the infantry really needed. Back. Note 22: Allenby to Lady Allenby, 10 April 1917. Allenby Papers, LHCMA, 1/8/2. Back. Note 23: Something the First Army had depended on as a secret weapon; see Appendix 11 of OH 1917, vol. 1. See also Sanders Marble, "Secret Weapons in the British Artillery 1916-1917," Military and Naval History Journal 11, (April 2000): 43-51. Back. Note 24: H. W. Wynter, "The Revival of the Barrage," JRA 70:4 (1943): 273. SS 158 (Notes on Recent Operations...), 164 (Notes on the use of Tanks...), and 168 (Notes on the Employment of Serviceable Guns... captured...) were all published after Arras but in time for Messines. Back. Note 25: So detailed and complete was the planning that IX Corps' plans for operations, administration, and artillery were printed by the U. S. War Department as examples for fledgling U. S. staff officers. U. S. Army War College, eds., Artillery Operations of the Ninth British Corps at Messines, June, 1917 (Washington, D.C: GPO, August 1917); The Attack of the British 9th Corps at Messines Ridge (Washington, DC: GPO, August 1917 Back. Note 26: Time available did not lessen the volume of paperwork, and Neil Fraser-Tytler wrote on 3 June 1917, "On my way back I called at Brigade HeadQuarters for tea and found them up to their necks in paper connected with the most ambitious and complicated Artillery Barrage that has ever been evolved by the British Army. On being bribed by the Colonel with a well-polished Dunhill pipe, I weakly promised to lend them for a few days my private Corona Typewriter to enable them to cope with this flood-tide of paperwork." N. Fraser-Tytler, Field Guns in France: With a howitzer battery in the battles of the Somme, Arras, Messines & Passchendaele 1915-1918 (Brighton: Tom Donovan, 1995), 178. Back. Note 27: Birch to Harington (MGGS Second Army), 16 May 1917, Anstey Papers. GHQ did intervene, but only to increase on the number of heavies the Second Army requested. Anstey galley proofs, 160. Back. Note 28: Harington to Davidson, 11 May 1917, Rawlins Papers, file 12a/13. Back. Note 29: "Ubique," "Appreciation," JRA 87:1 (Spring 1960): 35-36. Back. Note 30: WO158/215, OAD458, 24 May 1917, and especially 29 and 30 May 1917. Back. Note 31: Letter, 27 May 1917, Anstey Papers. Back. Note 32: There was a rather feeble idea for a tank attack, devised in the winter, which seems to have sunk under its own weight. Haig Diary, 10 February 1917. The Second Army did some planning in January 1917, but no action was taken in the intervening months; WO158/38. Andrew Wiest has examined matters closely in his Passchendaele and the Royal Navy (New York: Greenwood Press, 1995). Back. Note 33: General Sir Ivor Maxse Papers, IWM, file 35/1, notes for conference, 23 May 1917. Back. Note 34: SS170, "... Co-operation between Aircraft and Artillery ... on the Second Army Front" (June 1917); SS172, "Preliminary Notes on Recent Operations ... Second Army" (July 1917); SS131 on RFC co-operation (August 1917); SS135, "... Training of Divisions for Offensive Action" (August 1917). Back. Note 35: Buckle had replaced George Franks on 7 July; Franks went to command the 35th Division. This was probably not a situation of Franks being removed for cause; he had been in his post for over eighteen months, and he had done little wrong. Franks may also have been tired: he did not command the 35th Division long, and went to a Home command when he left the division. More interesting was the promotion of Buckle: he was one of the first RGA officers to be a Corps BGRA (July 1916), and was the only RGA officer to be promoted to MGRA, finishing the war in that post with the Rhine Army. Back. Note 36: Robin Prior and Trevor Wilson, Passchendaele: The Untold Story, (New Haven: Yale University Press, 1996), 115, n. 10. It was a vast problem: for a front of 13,200 yards, the Second and Fifth Armies had to cut over two hundred linear miles of German barbed wire, much of which would be in considerable depth as well. WO158/38 Back. Note 37: MUN4/3377 and W. St C. Bland Papers (RAI Military Document 1126); Headlam to Minister of Munitions, 31 July 1917. Back. Note 38: OH 1917, vol. 2, 239 credits twice the weight of shell in half the area as before 31 July. Back. Note 39: Memorandum, Davidson to CGS (Kiggell) 26 June 1917, WO158/20. Back. Note 40: WO158/239, Fourth Army Operations files, August 1917. Back. Note 41: Haig Diary, 11 June 1917; WO158/239, with Haig's marginal notes. Back. Note 42: Haig Diary, 5 July 1917 and 2 September 1917; Rawlins, History, 269. Back. Note 43: Sir Hugh Tudor Diary, RAI Military Document 1167, July 1917. J. P. Harris, Men, Ideas and Tanks: British military thought and armoured forces, 1903-1939 (Manchester: Manchester University Press, 1995), 108-113, traces responsibility for the idea, quashing Tank Corps claims and elevating the role of Byng, the army commander. Back. Note 44: Sir B. Brooke, 15 May 1945, CAB45/118. Presumably Lecky remembered his predecessor's fate the last time the Third Army tried something new with artillery. Or the reports of him as dim may have been true, e.g. C. E. Vickery, 14 February 1938, CAB45/116. Back. Note 45: The artillery Instructions are printed as Appendices 6A, B, and C in OH 1917, vol. 3. Back. Note 46: This is another triumph of the SS pamphlets, for there was no official contact between B. R. Kirwan, who had devised screen calibration, and Tudor, who turned the technology into tactics. See E. A. James Papers, IWM, for movements by the 9th Division; Tudor's diary shows that he learned of screen calibration on November 16, 1917, months after submitting his plan. Back. Note 47: Haig visited Third Army divisions from 12 through 15 November, and attended a conference of the Corps Commanders on the 16th. Haig Diary, 12-16 November 1917. Back. Note 48: Uniacke Papers RAI, VII/2, "Lessons from the 1917 Battle Fighting of the Fifth Army from an Artillery Point of View." Back. Note 50: Emphasis in original. Back. Note 51: Haig noted about a dozen minor British attacks, or German withdrawals, between July and September. This is an imperfect index but suggests how much more fluid the Western Front was in 1918 than previously. Haig Diary, July-September 1918. Back. Note 52: Hamel was so successful that it was written up in detail in a "Note on Recent Operations" and also as SS218 ("Operations by the Australian Corps against Hamel, Bois de Hamel, and Bois de Vaire, 4th of July 1918," July 1918). Haig Diary, 4 July 1918. Although an operation involving less than a division of infantry, Haig and Birch had visited corps headquarters to observe preparations. Haig Diary, 1 July 1918. Back. Note 53: For a brief but very lucid overview, see Prior and Wilson, Command on the Western Front, 295-300. Back. Note 54: OAD291/33/1, 11 June 1918 in Haig Diary. Birch had drafted a memo two days earlier that made exactly the same points; it is available as Appendix 42. Rawlins papers, file 11. Back. Note 55: Army Form W3981, "Barrage Table for No_ Gun," J. Batten Papers, RAI Military Document 1348. Back. Note 56: Rawlinson Diary, 21 July 1918. The operations of Rawlinson's Fourth Army, which fought at Amiens and then broke the Hindenburg Line, are well covered in Prior and Wilson, Command on the Western Front, 301-391. Their interpretation and mine differ in places. Back. Note 57: Letter 32(G), Fourth Army Papers, vol. 49. Back. Note 58: Letter 265(G), 11 September 1918, Montgomery-Massingberd Papers, LHCMA, file 7/26/1. Back. Note 59: However, he did have to repeat himself before GHQ would agree: letter 270(G), 19 September 1918, Fourth Army Papers, vol. 49. Back. Note 60: Rawlinson Papers, "Remarks on Artillery Action based on the operations of July 4th 1918." Back. Note 61: Birch to Edmonds, 8 July 1930, CAB45/132. Back. Note 62: Fourth Army Artillery in the Attack on the Hindenburg Line, 29 September 1918, Fourth Army Ops. Papers, vol. 52. Back. Note 63: Haig Diary, 18 September 1918. Oddly, the previous year Tudor had wanted to attack the Menin Road Ridge without a bombardment: Diary, 26 September 1917. Back. Note 64: For full details see A. G. L. McNaughton "The Capture of Valenciennes: A Study in Co-ordination," Canadian Defence Quarterly 10:3 (April 1933): 279-94. Back. Note 65: Haig to Boraston, 24 June 1926, Colonel J. H. Boraston Papers, IWM. Back. Note 66: "F. W.", "Artillery and the General Staff," Journal of the Royal United Services Institute 64:455 (August 1919): 470-77. Appendix 38 contains the entire article. Back.
|