 |
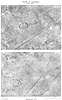
Photos 1 and 2, Dammstrasse 28 O 3. Trenches could survive tremendous bombardment. The German trenches are relatively intact in the 'after' photo, but the number of Germans in those trenches that survived to fight—and were willing to fight—was significantly reduced.
Detail (1229 x 762) |
|
|
||
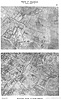 |
Photos 3 and 4, Destructive shoots on hostile batteries. These two photos show how accurate artillery fire could be. The first photo shows the effects of ordinary neutralizing fire; the second one shows the destroyed German positions. The roads were the other main target.
Detail (1271 x 773) |
|
|
||
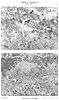 |
Photos 5 and 6, Photographs of barrage. These seem to be photos of preliminary barrages that would have been fired to test the British plans and inflict losses on the Germans. The upper photo shows the field artillery barrage, in both its depth and density; apparently some of the shells used were smoke shells. The lower photo shows some of the howitzer element of the barrage, moving along German communications trenches to block reinforcements moving forward or the trench garrison from retreating.
Detail (1275 x 756) |
|